

Hiking in Zion National Park
Something I noticed when planning my first trip to Zion was that using Pinterest to find blog posts about the best hikes led to some great posts on must-see hikes; however, none of these articles explained where the hikes were located in the park or even how to get to the trailhead. Now, I like to have my days loosely planned (weather is always a variable for hikes, so of course, nothing is set in stone), but I like to know how many of these great hikes I can fit into one day. I obviously want to avoid choosing a handful of hikes that seem awesome but are all in completely different parts of the park. I wanted to find lists that explained what hikes to do, one after the other, because of their proximity. Unfortunately, I didn’t find a single post like this while planning my trip.
So I’m here to do something a little different, and that is to give a lay of the land, explain where the shuttle stops are, and then go into detail about each hike that can be accessed via the shuttle and the highway within the park.

Lodging & Car Rental
First, let’s start with the basics. After arriving in Zion, which is located in the small town of Springdale, Utah, there is plenty of lodging available. You can take your own vehicle if you’re more comfortable, but my husband and I opted for a rental. We got a Kia Soul and we loved it! As long as you have something a bit larger than a midsize with 4 wheels, you’re in the clear. All roads are paved, and although you’re mostly in the desert in Zion, there isn’t much sand on the roads.
There are many lodging options right outside of the park entrance in Springdale. From hotels to rustic lodges, there is something for everyone. If you’re looking for something less expensive, there are probably AirBNB and couchsurfing options available to all travelers as well. And finally, there is a beautiful campground right inside the park to use; however, it seemed to be full during my whole visit, so I recommend making a reservation well in advance.
Parking & Shuttles
There are two options for parking while visiting Zion, either in Zion National Park’s parking lot or in Springdale. If you get up early and arrive before 10 am, you’re almost guaranteed a spot. Many blogs like to dissuade visitors, noting that the parking lot is full all day long. Even if the signs say the lot is full, drive in and look around, someone may be leaving for the day.
If no spots are available, don’t worry. Parking in Springdale is just as good! Most places in Springdale are paid parking spots; however, as far as I can remember, we paid $20 for the entire day. We were able to leave our vehicle until 11:59 pm for a flat rate. Overall, it’s not that expensive considering all the restaurants, shops, and the free shuttle that is made available to you.
The free shuttle in Springdale makes stops that stretch to the end of the town and back again, so no matter where you park, there is transportation to get you into Zion. You can find the Springdale shuttle schedule and map of stops on the Zion National Park information sheet handed out at the park entrance. There are nine stops in Springdale, the first being at the pedestrian entrance of the park, which is where visitors cross a footbridge into the park. This shuttle goes all the way to the ninth stop, which is at the Majestic View Lodge, on the outskirts of the small town. The stops in between are easy to spot as they look like covered bus stops and are generally in the front of restaurants and hotels.

Park Admission & Passes
Generally, a national park will charge an entrance fee per car which is great when you are traveling with several people in one vehicle, but not good if you are planning an extended stay and driving in and out of the park daily, especially if admission is $35 (this varies depending on the park you visit). This is where the America the Beautiful pass comes into play. This annual pass can be purchased at the park entrance (or any park entrance) for a flat rate of $80 per car. For the whole year, this pass gives access to any national park, monument, battlefield, or historical site in the United States. My husband and I invested in this once we arrived, and after two days, it had already paid for itself.
Knowing this is so affordable and convenient for park visitors, and considering if almost all of the cars coming in had this pass, it makes you wonder if the park is missing out on money that is important for its public access and preservation. This is why it’s very important to give at least one small donation to the park whenever you visit–it is the best way to show your support.

Shuttle Stops & Hikes
And now for the fun part: the list of shuttle stops and hikes you can access. I’m combining these two elements, the actual hiking trails and the shuttle stops, in order for readers to better understand what kind of hikes these are and better plan their trip to Zion! So, let’s begin at the beginning.

Shuttle Stop 1 – Visitor Center
The first stop can be found a few paces past the Zion visitor center and bookstore. Here, you can catch a shuttle, ranging from every 15 minutes to every 5 at their busiest. At the busiest hour of the day, be prepared to stand, as seats fill up quickly, but don’t worry, the drive between each stop isn’t too long. There’s a lot to keep anyone occupied on the ride, including jolly shuttle drivers telling stories, amazing views of the park on what’s called the “Zion Canyon scenic drive,” and a very interesting audio narration of each viewpoint along the way.
The first few trailheads in Zion don’t require a shuttle drive to access, for they’re right off the main path of the Visitor Center entrance. These hikes begin with one of the most accessible, and also one of the most breathtaking, in the park.
*All times, distances, and elevation changes are documented here as round trip. If the trail is considered “there & back” but you only hike from point A to point B with no turnaround, cut these numbers in half for a more accurate idea of how long it takes to hike and the distance.
Pa’rus Trail
2 hours, 3.5mi, Easy
Considered an “out & back;” however, we were able to access the trail from shuttle stop three, Canyon Junction, and hike it all the way to the Visitor Center. It is what you make it!
Pronounced “Pah-Roo-Sus”, this is a Paiute word meaning “bubbling water.” This trail is paved and very flat, which parallels the deeper parts of the Virgin River, while you are surrounded by canyons on either side of you, as well as tall sandstone peaks in the distance. This trail is made for those who like to bike, and it is even safe to take your dog walking on. A small word of advice: Luke and I decided to hike this towards the evening, and there was rain in the forecast. It didn’t rain, but it was cloudy and we could see the storm in the distance. Because of this. it was cooler than it was in the high afternoon, and it was absolutely beautiful. If we would have hiked it at, say, 11 am, we would have been drenched in sweat. This is the type of trail that is a bit more empty but also more enjoyable in later hours when the sky is overcast. It made for some spectacular pictures too!


Archaeology Trail
30 minutes, 0.4mi, Easy
This is a short trail that takes you up to the top of a small plateau overlooking the visitor center, the parking lot, and Zion valley in the distance. This trail is considered “easy” because of the short distance, however, it is a steep climb to reach the top of the plateau. Once you reach the top, there are a few informational signs about early Native American settlers using this very plateau for shelters and crafting. Signs also ask that visitors tread lightly as they explore once at the top, so as to not disturb the prehistoric site.


Watchman Trail
2 hours, 3.3mi, 368 ft, Moderate
I included the elevation change because this hike is a climb to the top of a high peak. Once at the top, you’ll be on a plateau with exceptional views of Springdale and Zion Canyon in the distance. This is a treacherous climb, but it is so worth it. It was actually my absolute favorite of them all! The terrain was a bit more rough (as most of the trails are pretty nicely paved) and sand-covered, the flora and fauna was stunning, and the hike up and back down had equally great views as did the summit.


Shuttle Stop 2 – Museum
The next shuttle stop is at the Human History Museum. There are no trailheads here, however, the Pa’rus trail can be accessed from here. I wish I had more information on the Human History Museum but I never had a chance to visit it! Definitely check it out if one day is too rainy, or even too hot to take a hike.
Shuttle Stop 3 – Canyon Junction
Stop number three also doesn’t have any trailheads; however, the Pa’rus trail is accessible from this stop. Also, this stop is where the road branches off onto Mount Carmel Highway, where there are a few other trailheads to be found (but it is recommended to travel to these trails via car!)
Shuttle Stop 4 – Court of the Patriarchs
This stop gives you partial access to the Sand Bench Trail (but the actual trailhead is at stop five). The main attraction is the viewpoint atop a short yet steep climb. Once you arrive at the top of the viewpoint, you have a fantastic view of the three sandstone cliffs known as the Patriarchs. They are named for biblical figures Abraham, Isaac, and Jacob.


Shuttle Stop 5 – Zion Lodge
There are two different trails that this stop gives you access to, the Upper and Lower Emerald Pools Trail and the Sand Bench Trail. When I went, in October 2018, the Upper Emerald Pool trail was closed due to a rockfall. Rock falls happened on several other trails in the park due to heavy rainfall in the Summer months, June mostly.
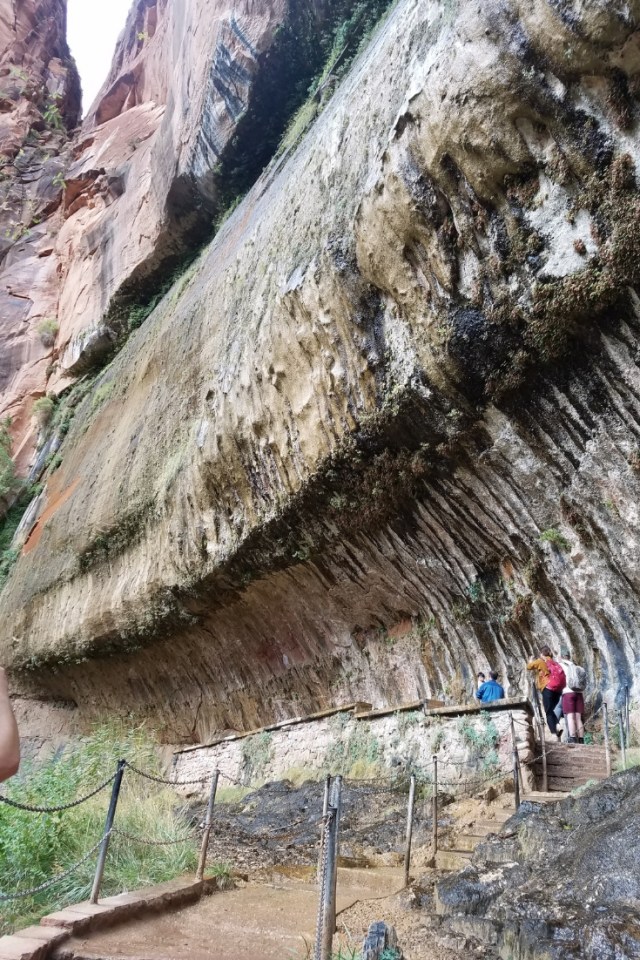
Lower Emerald Pool Trail
1 hour, 1.2mi, Easy
The lower emerald pool trail is an easy hike with beautiful views that brings you into a beautiful oasis with lush trees and flowers surrounding an emerald pool, just like the name. Hikers can follow the trail and continue past the pool to the upper pool, however when I went, the trail that led to the next pool was chained off and there was significant rockfall (which you can see in one of the photos below).


Sand Bench Trail
5 hours, 7.6mi, Moderate, Loop
So, we didn’t hike the entire sand loop trail! We hopped on the trail (which is usually reserved for horses from March to October) and departed it at the Court of the Patriarchs. If you stay to the right, you can take the trail all the way down the last couple of miles, and turn back heading towards the trailhead. This trail is very flat without many elevation changes, however, since it is a horse trail, it is mostly deep sand, making it pretty difficult to hike! I do recommend, however, to depart the trail at the Court of the Patriarchs, as it spits you out in the middle of a clearing, giving you a 365-degree view of the canyons and the three cliffs towering above you. It may be more spectacular than climbing to the viewpoint.


Shuttle Stop 6 – The Grotto
This shuttle stop lets off at a trail of the same name, but also one of the most popular, and deadly, trails in the park – Angel’s Landing. There is also the Kayenta Trail that can be accessed here, but the trail was closed for us due to a rockfall.
The Grotto Trail
30 mins, 0.4mi, Easy
This is a rather quick and easy dirt path trail that takes you alongside the road, and you can follow it back to the Zion Lodge. As you walk alongside the road, you can see beautiful sheer cliffs only a few feet away. No matter how easy or difficult the hike in Zion, the views are always spectacular!


Angel’s Landing
4 hours, 5.4mi, 1488 ft, Strenuous
Let me start by saying this hike is not for everyone. It may be considered touristy or a must-do; however, if you aren’t comfortable with heights, being surrounded by sheer cliffs on either side of you, or knowing that you would need to rely on support chains to make your climb, this is not the hike for you.
With that being said, this hike took us over four hours, easily five to six hours, so definitely get an early start if you plan to hike the landing. One of the most difficult and strenuous portions, in my opinion, was the climb up the switchbacks before getting to the summit climb. These switchbacks are known as “Walter’s Wiggles” and although it seems like a fun, quirky title, that climb is an extremely steep incline, and it is tough! There is a stopping point at the top of the first initial climb called Scout’s Landing. There is a communal restroom here (which I highly recommend you DO NOT USE unless it’s an emergency) and a good place to have a good, long drink and snack break and decide if you’ll continue to the summit of the landing or not.
Once you begin the climb, it’s all about going slow and focusing. Do not rush, the cause of all fatal falls from this hike is due to visitors rushing through the climb and not allowing other hikers to pass. There are support chains to use as you climb, but it’s important that you do not solely rely on them. Once you make it to the summit, you can stop, or trek out onto the “landing” and honestly I felt too unstable to do so. The trails were covered with sand, and it caused my shoes to slip more than I was comfortable with. I can still say I made it to the top, but it is extremely important to be realistic and not push yourself if you’re not 100% confident in completing the hike.


Shuttle Stop 7 – Weeping Rock
The seventh shuttle stop has another one of my favorite hikes, Observation Point. This stop also leads to the Hidden Canyon trailhead, which was closed due to rockfall when I visited.
Weeping Rock Trail
30 mins, 0.4mi, Easy
This trail is very easy, and also very beautiful. We hiked it as we watched a rainstorm in the distance, and it was completely overcast. Depending on where the sun is, behind the clouds or blazing, gives the rocks a completely different look and color. It appears as though you’re never in the same place twice. Weeping rock is named for a rock overhang that you walk underneath, and you can watch the water trickle off from the rocks above. Because of the way the water trickles down, there are “hanging gardens” which is a very unique way that flora and fauna grow. Instead of straight up from the ground, they grow from the walls, where the water source is, and gravity causes the pants to hang down.

Observation Point
6 hours, 8mi, 2148 ft, Strenuous
This hike, in my opinion, was more strenuous than Angel’s Landing. It is steeper, takes longer, and you end at a summit of a much higher altitude. During the climb, we were able to see the top of Angel’s Landing below us, a bit off in the distance. I could definitely feel the elevation change, and the higher you climb, the windier, and colder it gets! There is no climbing along cliffs using chains on this hike, so it’s safer; however, the sheer cliff on one side is much steeper with a longer drop off. The summit is beautiful, as you end up at the top of a plateau, covered with lush evergreens, along with sandy trails. At this vantage point, you get a stunning 365-degree view of the entire Zion Canyon!


Shuttle Stop 8 – Big Bend
Called “Big Bend” because of the part of the river it’s located at. There are no trailheads that can be accessed at this stop.
Shuttle Stop 9 – Temple of Sinawava
This is the final stop on the Zion shuttle taking you to another one of the most popular hikes in the park, The Narrows.
Riverside Walk
1.5 hours, 2.2mi, Easy
This hike was the first one we tackled when we arrived at Zion. It is beautiful in any weather, and at every turn, the views are spectacular. Riverside walk is a hike that takes you directly along the Virgin River on a paved and open path. Once you take it all the way to the end, you can explore the rocky shores of the river and check out the entrance to The Narrows.


The Narrows
8 hours, 9.4mi, Strenuous
The Narrows is a very unique hike, as you are wading through the cold waters of the Virgin River the entire time, and you are surrounded by high canyons on both sides of you. The further in you go, the more narrow the hike becomes, so it is a good idea to start as early as possible (we got in the water at 8 am) so you can beat the crowds coming back. We finished up at around noon, and there were so many hikers on the way back it took us twice as long, and it was even more tiring than going against the current. The current was pushing us, but we were forced to wait for huge groups of tours coming through!
Speaking of tours, you can get outfitted and go on a guided tour with many others. However, Luke and I opted for a private guided tour. This is something you may want to strongly consider if you have never hiked the Narrows before. Since you’ll be hiking completely in the water, you need special waterproof shoes, neoprene socks, and waterproof coveralls. We also wore a fleece base layer under our clothes, carried larger packs, and used walking sticks to navigate the river. The water is mostly clear, but the floor is covered with rocks of different sizes, so a walking stick is important to keep your balance!
Lastly, we didn’t hike the entire nine miles. With our guide, we went about a mile in and then turned back. No matter how long you go, you get scenery unlike anything you’ve ever seen, at the base of sandstone canyons! (I did see several hikers, which I assume were novices, take to the waters wearing only shorts, and barefoot – please reconsider and get outfitted before hiking this for the first time!)
*If you’re planning on hiking the Narrows, be sure to check the weather! If there is any sign of rain, you should not go into the canyon because of how prone it is to sudden flash floods. Our hike was pushed back until the very last day of our time in Zion due to some rain. This is another reason why you should hike it guided the first time.


Other Hikes:
Canyon Overlook Trail via East Side Tunnel, Mt. Carmel Highway
1 hour, 1 mi, Moderate
If any hike in Zion can be called overrated, it would be this one. Canyon Overlook does have a breathtaking view of the canyon, but it doesn’t compare to other, longer hikes in the park. This one is a bit out of the way and can be accessed by a trailhead right before you enter Mt. Carmel Tunnel. It is a moderate hike only because of the terrain you are trekking on, as it’s not as paved like the rest of the trails. The hike itself was amazing, but I also disliked it the most because of how incredibly packed it was during off-hours in the rain. It was just filled with rowdy teenagers, loud tourists, and tons of people hogging for spots to take selfies. It is worth the hike, but this is by far not the best hike in the park to garner that many people at one time!


Pine Creek Waterfall Trail via Mt. Carmel Highway
45 minutes, 0.7mi, Moderate
This hike was really cool and very different as you’re hiking in a more lush part of the park. The trailhead can be found around one of the last bends before you enter the park. There is a parking area and a wooden sign with an arrow pointing to where you begin. It’s easy to follow from there, but we got kinda lost and ended up exploring a bit of a stream. We did not find the waterfall, for we believe it’s something you see better during the summer months. We hiked it during a very cold and rainy afternoon, and there was no one around, so we had the trail all to ourselves and we were able to take our time and really enjoy the natural flora and fauna, and being surrounded on all sides by the sandstone cliffs towering up above us.


There are so many more hikes to be done, so much more to explore, so many more adventures to be had in Zion, and trust me, ten days simply isn’t enough to fit it all in! We didn’t venture to the western half of the park, known as the Kolob Canyons via Kolob Terrace. We did do some rappelling nearby but did not get a chance to access any trailheads. But no matter how long you have, I definitely recommend Zion for anyone looking to visit somewhere beautiful, hiker or not!
Have you ever been to Zion? Do you have a favorite hike? Share your stories below! Also, don’t forget to Pin!

One thought on “Hiking in Zion National Park”